

| Next Post - Previous Post List View
| |
 | 7/1/2016 11:42:15 AM Tool Review - Ryobi One+ Caulk Gun |
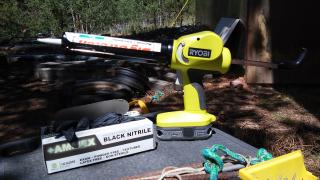
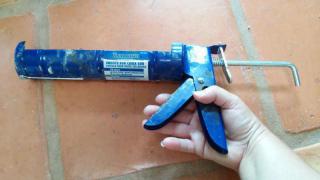
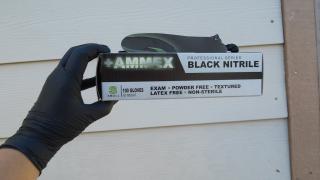
When you need to caulk something, there has been historically two options. A small tube that you squeeze with your hand or a classic caulk gun. And while the small tube may work for very small areas, anything more than a few feet of caulking really requires a gun. With any caulking gun, practice is a must to get a nice bead squeezed out as well as successful "tooling", usually done with a wet finger. The ideal is to have a clean gap no less than 1/8 inch and no wider than 1/4 inch, and squeeze a bead into the gap that fills the gap with very little overflow and then rub it down with a finger to create a smooth surface and tight connection to the sides of your gap. There are a million videos available on how to do this, as well as how to deal with larger or smaller gaps, so I am not going into more detail on "how" and am going to focus on comparing a standard caulk gun to the Ryobi One+ 18 Volt Electric Caulk Gun (and similar electric caulk guns). It is worth noting that no matter what type of caulk or caulk gun you use, having a clean surface is very necessary, so I spent a lot of time scraping old failing primer, dust, and dirt off the shed that was never properly sealed or painted with a spare grill brush. (Hey, grill brushes are cheap and work great.) Also worth noting, is fitted disposable gloves. It is very worth making a special purchase from Amazon to get disposable gloves that actually fit your hands unless you happen to be lucky and the "large" available in local stores manages to fit you well. While using a wet finger to smooth out your caulk can work in a bathroom, it is less do-able outside, 15 foot up a ladder. Clipping a rag or throw-away towel to your shirt also provides for a convenient place to wipe away the excess caulk on your gloved fingers.  Classic Caulk Gun... The classic calk gun is a purely mechanical tool relying on the pressure and grip of your hand to push out the caulk. As a person with near-child-sized hands and not a lot of upper body strength, it is a tool that I use a lot more than I would like to and curse it's design each time. On the other hand, a mammoth sized professional plumber can use this tool like a toy and create perfect caulk lines without issue. So the usability of a classic caulk gun is very dependent on your size, strength, and skill. Classic Caulk Gun... The classic calk gun is a purely mechanical tool relying on the pressure and grip of your hand to push out the caulk. As a person with near-child-sized hands and not a lot of upper body strength, it is a tool that I use a lot more than I would like to and curse it's design each time. On the other hand, a mammoth sized professional plumber can use this tool like a toy and create perfect caulk lines without issue. So the usability of a classic caulk gun is very dependent on your size, strength, and skill.Benefits: Sure a heck load better than trying to squeeze little tubes of caulk for any real project. Drawbacks: For someone with less than He-Man strength, you will have to cut a larger opening (and therefore make a larger bead), hands and wrists will suffer from grip pressure, and if you have small hands it is a constant struggle to get a grip around the large-man-hands trigger and keep an even flow. Additionally, letting go of the trigger doesn't stop the flow and you have to depress the clip on the back to release pressure and stop the flow.  Ryobi One+ 18 Volt Electric Caulk Gun... I think it is corny how often "game changer" is thrown around. Really? What game were you playing and how changed is it really? But... holey-moley! If I were playing any kind of "game" with my tubes of caulking, this would be the "changer". Ryobi One+ 18 Volt Electric Caulk Gun... I think it is corny how often "game changer" is thrown around. Really? What game were you playing and how changed is it really? But... holey-moley! If I were playing any kind of "game" with my tubes of caulking, this would be the "changer".First I did a quick review of the manual and then headed out to put this tool through its paces sealing up the seams on the shed. With a normal caulk gun, I would have to cut the caulking tube tip at almost 1/4 inch to be able to squeeze it out, but I thought I would really test out the power of the Ryobi by cutting the hole at a little under 1/8 inch diameter since most of my caulk seams were dreadfully undersized. I was quite shocked when, with a pull of the power-drill-style trigger, it sent a smooth stream of caulk right out of the tiny opening. Huge score for Ryobi, but even more significant was the dead stop of flow when I fully released the trigger! Some notes on using the electric caulk gun...
Benefits: Comfortable trigger for small and large hands. Smooth pressure for nice beads. Almost always full stop on trigger release makes it an ideal gun for short sections and use in difficult places (like on a ladder bending over half-backwards under the ledge of a roof). Despite the increased weight, the ease of trigger pull means significantly less strain on hand and wrist. Drawbacks: Cost is about four to five times that of a classic caulk gun and could be much more if you don't already have batteries and a charger. Weighs quite a bit more than a classic caulk gun. Results... For me, I hemmed and hawed about buying the electric caulk gun for almost two years after I knew it existed. I kept thinking after every hand-bruising, wrist-damaging, pain-in-the-rear project, that I was pretty much done with projects requiring caulk... then the next project would crop up and require three more tubes. After getting a chance to use the electric, I wish I had bought it with the very first Ryobi One+ tools I got. The electric caulk gun isn't a magic wand. It won't make perfect results without practice, just like any caulk gun. However, the ease of use can start to feel like magic and can help make those perfect results by easing the process to get there.
| |
Next Post - Previous Post List View | |
| COMMENTS | |
| 7/3/2016 8:43:40 AM Punkin Finally a toy that makes a must job fun. In no time you will be a pro-caulker. |
Add Your Comment...


