A2 Hosting still has not fixed the Database after their servers failed AGAIN. A2 Hosting is the WORST!
Because of this, new posts are currently missing and I can only HOPE they eventually recover the table they didn't restore after their latest failure.


Next Post - Previous Post       List View


7/29/2014 3:30:15 PM

How to Make Your Own Cooling Bands

crafts   DIY   ideas   low budget   travel  


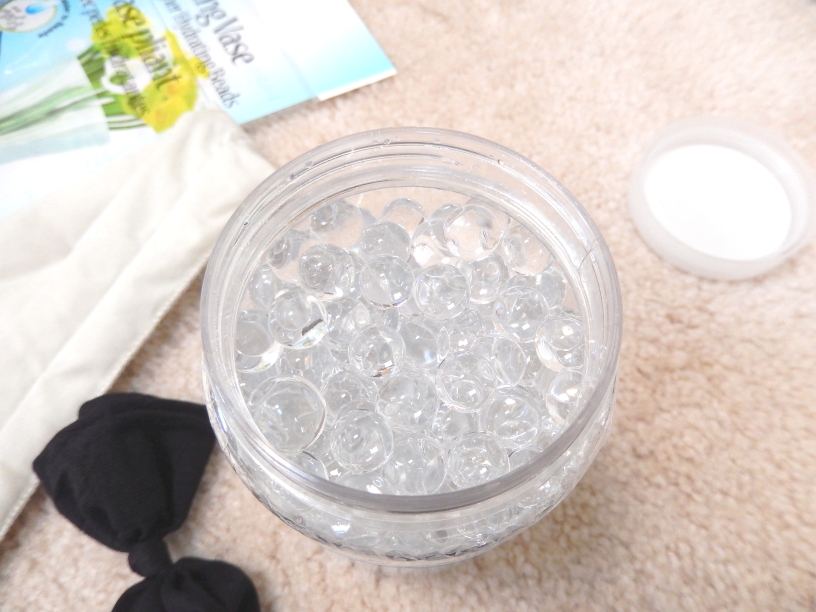
My recent trip to Topeka, Kansas was a long one with no air-conditioning, but having some cooling bands really made the difference and I had a fun time with my niece on her driving trip to visit my parents.  I wrote a post about Road Trip Tips with some additional information about types of cooling bands, but since I have a hard time finding cooling bands when I need them, I thought I would also write up a "How To" for making cooling bands as well.

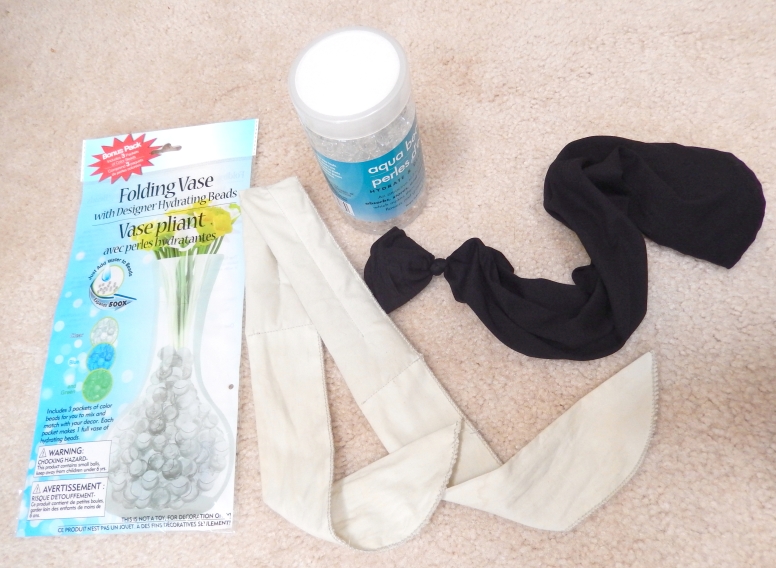
The cooling band in this tutorial is a cotton cloth band with polymer beads inside.  The beads swell with water and slowly release the moisture.  The moisture evaporates and creates a cooling effect, though the band may need rotated frequently in very hot conditions.  These are great for light cooling and pretty permanently re-usable (just make sure you hang them with air-flow when not in use so that they do not mildew, and occasionally wash by hand with a little soapy water then rinse and hang to dry). 

There are three reasons to make these cooling bands instead of buying them.  First, while the price may be cheap at a dollar store for these bands, they are made just as cheap.  Extra thin material, rough edges, and mediocre sewing can lead to beads eventually getting squished and leaking little polymer bits from the sides and stitching.  Second, while the dollar store price can make them perfectly reasonable as a semi-disposable item, finding them in a store when you want them is often impossible.  And third, color choice at the store is poor at best compared to the wide array of colors available at a fabric store.

So here is how to make them with higher quality and still at a very low cost.  The cost can vary greatly depending on how much you pay for your cloth, but the average cost is probably $0.50 to $1.50 per band if you make several at a time.

Supplies List:
  • Cotton cloth... selection of cloth is very important here.  Thin to medium-weight cotton cloth with no stretch in either direction and very fine thread-count.  Hold it up to the light, if you see pin-holes of light coming through, it is probably too porous and the polymer beads may leak through if they get squished.  (See picture below for sizing.)
  • Polymer Beads... often found at a dollar store or craft department in the flower or fake flower area.  They are sometimes in jars already hydrated, and sometimes dehydrated in a package with a plastic vase.  Either way is fine, but it is a good idea to make sure the beads are hydrated before the project so that you don't accidentally put too many in the band when you are filling it.  ( One band will use approximately 1/3 to 1/2 bottle of beads. )
  • Thread
  • Beginner sewing skills
Here is a picture guide with the steps detailed below:
Click on Picture to Enlarge...
Cooling Band Pattern
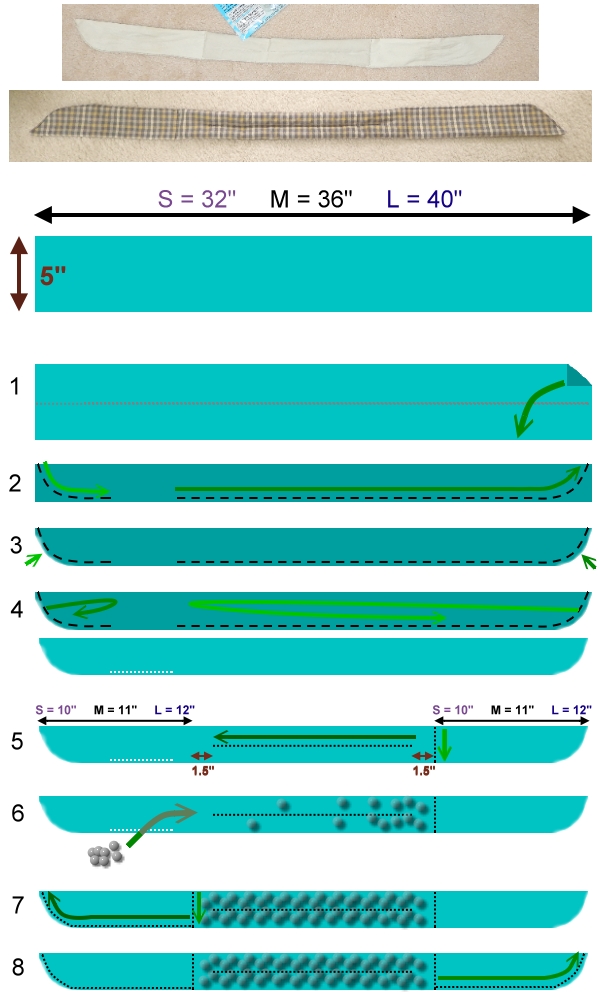
( The store bought is the cream colored band at top.  I used it for my initial pattern, but made several changes to increase quality and durability. )

Note:  I can use the "Small" size as a headband with a cute knotted bow.  However, I have a very small head, so the medium or large is probably more appropriate for most people.  However, if you will only be wrapping around your wrist or ankle, the small size may be fine for you.  Cut the material to the length desired and five inches wide.

1.  Fold material lengthwise.
2.  Sew along edge with curves towards the folded edge at the corners, leaving a gap about two to three inches wide on one side after the curve.
3.  Cut away excess on curve.
4.  Turn the tube inside out through the gap and smooth out.
5.  Stitch across the fabric at the correct distance from one end, and stitch down the center along the length of what will be the bead area... leaving a gap of 1.5 inches from the other stitching.
6.  Insert beads through the gap and gently push them down into the center area.  Fill to just barely past the center line stitching.
7.  Stitch across the band to lock the beads into the center and continue along the outside edge towards the end.  This stitches closed the gap and keeps the band flat and the end nicely curved.
8.  Stitch the other edge to match.

To use, soak the center of the band in water to hydrate the polymer beads and then tie as a head band, around neck, wrist, or ankle.


     POST LINKS BACK TO:
          7/29/2014 3:03:05 PM - Road Trip Tips


Next Post - Previous Post       List View
COMMENTS

7/30/2014 9:32:14 AM Punkin
This is something I might be able to make. Thanks!

8/5/2014 9:27:25 AM TinkerT
It is a pretty easy project... the hardest part acctually is turning the tube right-side-out.  However, if you poke the end in with a dowel or some other smooth stick, it can be very quick and easy, too.

8/5/2014 3:50:17 PM Hubby
TinkerT has NEVER done well in the heat... which is one reason for us having gotten out of the South and moving someplace cooler. She has always been very crafty and I fully endorse and applaud her skills in making nifty neat things. The best part about these is, not only are they nifty neat, they are extremely practical in keeping my lovely wife cooled down enough to prevent heat stroke.
Having used these myself, both the commercial and home-made ones, I can honestly say that the home-made ones are better quality and if you can afford and find the stylish material, don't have to be the monstrous things some of the commercial ones tend to be. Double plus there.

Add Your Comment...

TinkerT Terms & Disclaimer


     Step one to DIY is safety. Use applicable safety equipment, read instructions, and handle all tools with care. While this site encourages a Do-It-Yourself attitude and has ideas and how-to posts, it is not responsible for any problems that arrise from attempting similar DIY projects.
     Familyweb.us and TinkerT makes no representations or warranties of any kind (expressed or implied) about the completeness, accuracy, reliability, suitability, or gramatical correctness of any information or recomendations contained on this site or found by following any link on this site. All the information provided on TinkerT is for general information and entertainment purposes only. Following any advice or information on this site is done "At Your Own Risk". Under no circumstances will Familyweb.us or TinkerT be liable for any loss or damage (including without limitation direct, indirect, or consequential loss or damage) arising from use or misuse of information provided in this website.
     Copyright Policy - Unless otherwise noted, Familyweb.us is the legal copyright holder of all material on this website. Submitions and comments will be considered the property of Familyweb.us and may be used, whole or in part, for purposes on the site or other related projects. Please feel free to copy and reprint any portion of the articles and posts on this site. However, you must include a clear label for where you got the material and include a link to the appropriate page for the post that material was copied from.
     The opinions expressed by any Third Parties (including commenters) are their own and do not represent the position or believe of Familyweb.us or TinkerT. TinkerT reserves the right to remove or edit comments for any reason deemed nessesary, including, but not limited to: spam, offensive language, inapropriatness, and general rudeness.
     TinkerT will never sell or share your email with any third party and will not send you advertizements or spam.
     Familyweb.us and TinkerT reserve the right to change the focus of, close, or sell this blog site without warning.

     While TinkerT and Familyweb.us strive to ensure all posts and comments are PG13 or less, it makes no guarantees of this and requests that anyone under 17 ask their parent's permission before signing up for the newsletter or reading this site.

     These terms and conditions are subject to change at anytime without notice.


aquariums
archives
cooking
crafts
denver
DIY
electronics
home improvement
ideas
landscaping
low budget
mountain living
nature
outdoor
painting
plants
style
the tilt
tools
travel
woodworking

instant pot
  smart scripts